Sada Roti Simple Trinidadian Recipe
November 2023
This page may contain affiliate links and ads at no extra charge to you. If you purchase something from these links and ads, West Indian Diplomacy may earn a small commission that goes towards maintaining the website and sharing our history.
Sada Roti
Equipment
- 1 Belna (Rolling Pin)
- 1 Tawa (Griddle)
- 1 Chowki (Surface for rolling)
- 1 Large mixing bowl
- 1 Tea towel
- 1 Wet paper towel
Ingredients
- 1 cup Self-rising flour (Gold Medal brand) (and some for dusting)
- ¼ tsp salt (or just a pinch!)
- 1 cup water (might not use all)
- 1 tbsp Oil (Crisco brand) (to tap on)
Instructions
Step 1: Preparing the Dough
- To begin, gather the basic ingredients for sada roti - flour, water, oil, and salt. (You could use substitute about 1/2 cup of flour for whole wheat flour but do not use only all whole wheat). Mix these dry ingredients together using your hand in a mixing bow.
- Then, gradually add water. When a large clump (about the size of your fist) forms, set it aside and make another one with some water. Set aside the dough that is stuck to one side while you work to form the same consistency with the dry flour portions.
- Once the water and the flour have formed one big ball of dough, you can add more flour if it is too sticky. You do not want it all to stick to the palm of your hands.
- Then you can start kneading the dough. You want to do this for about five minutes by continuously folding it and pushing it with your palm.
- Keep kneading until a smooth and soft dough forms. Then add the oil to both sides and push in with your knuckles.
Step 2: Resting the Dough
- Once the dough reaches the desired consistency, cover it with a wet paper towel and then tea towel. Allow it to rest for 30 minutes.
- After this, divide it into equal pieces and shape them into round balls.
- Cover the dough balls with a damp cloth or plastic wrap, and let them rest for a minimum of 10 minutes.
- This resting period allows the gluten to relax, making the dough easier to roll out later.
Step 3: Roll Dough and Cook Roti
- Now comes the exciting part - rolling and cooking the roti. Start with a floured surface and dust your rolling pin with dry flour to prevent sticking. Take one of the dough balls and place it on the floured surface. Use the rolling pin to gently roll the dough into round flat disks. The size will depend on your preference for thickness and the size of your tawa.
- While you are rolling the dough, heat a dry cast-iron skillet or tawa over medium heat. Once the skillet is hot, carefully place the rolled roti onto it. Cook the roti for about 1 minute until you see lots of small bubbles. Flip it over and cook the other side in the same way.
- The roti could puff up and have a slightly crispy texture. If your roti does not swell, you can "sakay" the roti by pulling back the tawa and inching the roti directly towards the heat and rotating it. You could also put the roti in the microwave for about 30 seconds.
- Repeat this process for each dough ball, rolling and cooking them one by one.
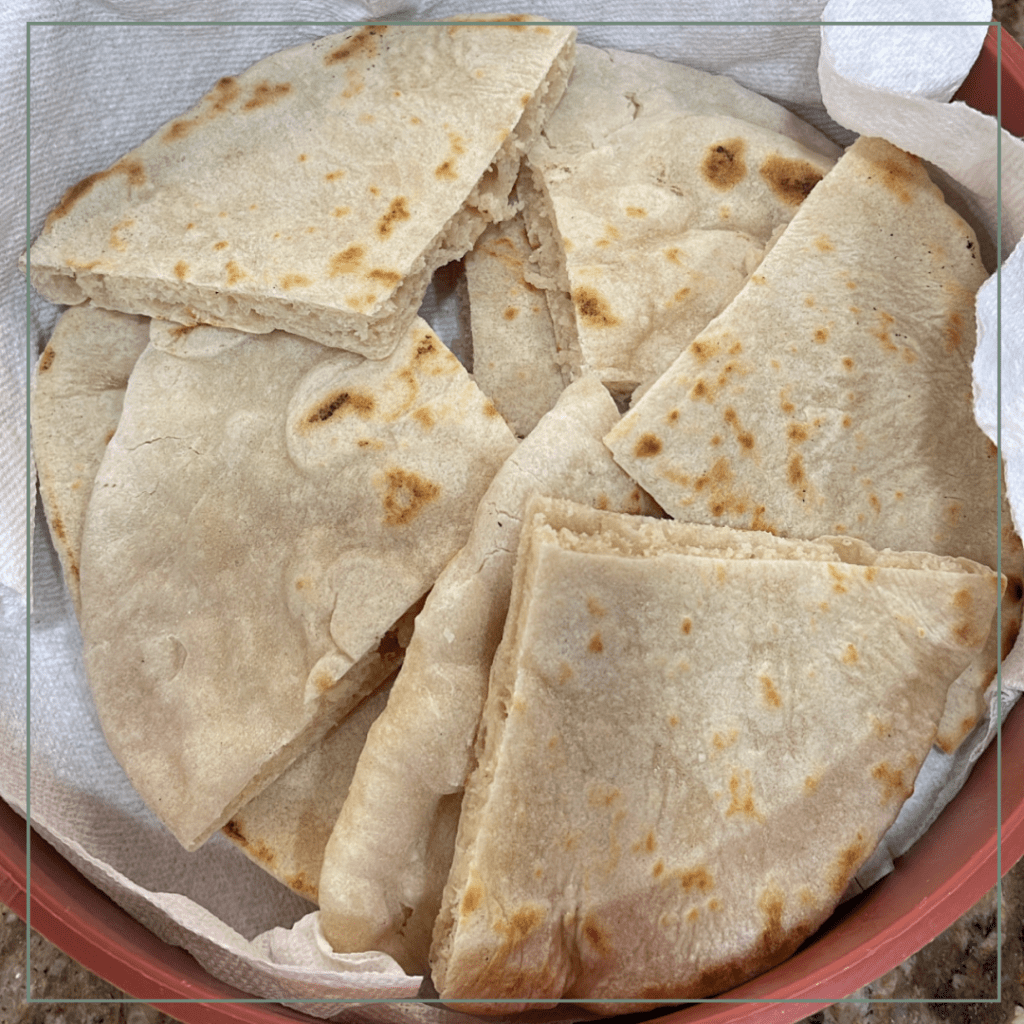
Sada roti, a staple in Indian cuisine, is a leavened flatbread that is loved for its soft and versatile nature. It is similar to a pita bread and often cooked on an open flame.
I'm on a roti journey and this is the first roti recipe that I am mastering. This is a good recipe to start with if you are a first time roti maker.
Whether you enjoy it with tomato choka, baigan choka (an eggplant dish), or any other vegetable dish, sada roti adds a delightful touch to any meal. If you've ever wondered how to make this delectable bread at home, we have you covered. Join us with this traditional sada roti recipe.
History of Sada Roti
I grew up eating all kinds of roti, including sada roti. My mom is the best cook. She made all different type of rotis for us with love, and I hope to do the same for my family.
Roti is a popular type of bread that is commonly consumed in various cultures around the world. Its history can be traced back to ancient times, where bread-making was an essential part of daily life.
The exact origin of roti is difficult to pinpoint, as similar types of flatbreads have been consumed in different parts of the world for centuries. However, roti is particularly associated with South Asian cuisine, where it is a staple food.
South Asian roti made it's way to the Caribbean via Indian indentured servitude. During the 19th and early 20th centuries, large numbers of Indian laborers were brought to the Caribbean as indentured servants to work on sugar plantations.
This oppressive system emerged after the abolition of slavery in the British Empire in 1833. In order to address the labor shortage on plantations, plantation owners turned to India, which was then under British colonial rule, as a source of cheap labor. Indentured laborers were recruited from regions such as Bihar, Uttar Pradesh, and Tamil Nadu, among others.
Between 1838 and 1917, approximately 1.2 million Indians were transported to various Caribbean countries, including Trinidad and Tobago, Guyana, Suriname, Jamaica, and others. These laborers faced difficult conditions during their journey and upon arrival in the Caribbean.
Indentured laborers were subjected to long contracts, typically lasting between five to ten years, during which they were required to work on sugar plantations under arduous conditions. Many experienced harsh treatment, inadequate living conditions, and low wages. This system closely resembled, in some ways, the exploitative nature of slavery that had been abolished.
Despite the challenges, Indian indentured laborers made significant contributions to the development of the Caribbean. They brought with them their culture, traditions, and knowledge of agriculture. They played a crucial role in transforming the agricultural landscape and becoming an essential part of the economic fabric in their adopted countries.
Indian indentured laborers also brought their religious practices, culinary traditions, and languages, creating a rich cultural fusion in the Caribbean. Today, the descendants of these laborers form a significant part of the Caribbean's diverse population and have contributed greatly to the social, cultural, and economic life of the region.
You can read more about Indian indentured servants in Trinidad here.
Sada Roti All-Purpose Flour Alternative
The ingredients for sada roti using all-purpose flour are:
1 cup All Purpose Flour (and some for dusting)
1 tsp baking powder
1/4 tsp salt
1 cup warm water (might not use all)
Step 1: Preparing the Dough
To begin, gather the basic ingredients for sada roti - flour, baking powder, and salt. (You could use substitute about 1/2 cup of flour for whole wheat flour but do not use only all whole wheat). Mix these dry ingredients together using your hand in a large mixing bow.
Then, gradually add warm water. When a large clump (about the size of your fist) forms, set it aside and make another one with some water. Set aside the dough that is stuck to one side while you work to form the same consistency with the dry flour portions.
Once the water and the flour have formed one big ball of dough, you can add more flour if it is too sticky. You do not want it all to stick to the palm of your hands.
Then you can start kneading the dough. You want to do this for about five minutes by continuously folding it and pushing it with your palm.
You can use your hands or a food processor for this step. Keep kneading until a smooth and soft dough forms.

Step 2: Resting the Dough
Once the dough reaches the desired consistency, cover it with a wet paper towel and then tea towel. Allow it to rest for 30 minutes.
After this, divide it into equal pieces and shape them into round balls.
Cover the dough balls with a damp cloth or plastic wrap, and let them rest for a minimum of 10 minutes.
This resting period allows the gluten to relax, making the dough easier to roll out later.
Step 3: Roll Dough and Cook Roti
Now comes the exciting part - rolling and cooking the roti. Start with a lightly floured surface and dust your rolling pin with dry flour to prevent sticking. Take one of the dough balls and place it on the floured surface. Use the rolling pin to gently roll the dough into round flat disks. The size will depend on your preference for thickness and the size of your tawa.
While you are rolling the dough, heat a dry cast-iron skillet or tawa over medium heat. Once the skillet is hot, carefully place the rolled roti onto it. Cook the roti for about 1 minute until you see lots of small bubbles. Flip it over and cook the other side in the same way.
The roti could puff up and have a slightly crispy texture. If your roti does not swell, you can "sakay" the roti by pulling back the tawa and inching the roti directly towards the heat and rotating it. You could also put the roti in the microwave for about 30 seconds.
Repeat this process for each dough ball, rolling and cooking them one by one. As you become more experienced, you will notice that the roti cooks faster, thanks to the direct heat of the skillet or tawa.
Variations and Tips for Making Perfect Sada Roti
While the traditional sada roti is delicious on its own, you can also experiment with different flavors and fillings.
When it comes to cooking sada roti, there are a few tips to keep in mind. It is recommended to use a cast-iron skillet or tawa for the best results, as they distribute heat evenly. Avoid cooking the roti on high heat to prevent burning. Instead, maintain medium heat and adjust as needed. Dusting the counter top/ chowki and rolling pin with dry flour will prevent the dough from sticking, making it easier to roll out.
To encourage the formation of small air pockets, gently press the edges of the roti with a kitchen towel while cooking. This circular motion will help create those desirable pockets and give your roti a light and fluffy texture.
Serving Suggestions and Enjoying Sada Roti
Sada roti pairs perfectly with various Indian vegetable dishes like tomato choka or baigan choka. The soft and pliable nature of the roti makes it an ideal companion to soak up the flavors of these dishes. The combination of the rich, spicy chokas and the delicate texture of the roti creates a delightful balance on your plate.
If you have never tried sada roti before, get ready for a treat. The first bite into a freshly cooked roti, with its softness and slightly crispy edges, is like a taste of authentic Caribbean cuisine. It's an experience that will transport you to the vibrant streets of Trinidad.
Sada Roti FAQ
1. What is Sada Roti made of?
Sada Roti is made primarily from all-purpose flour, water, baking powder, and salt. Sada Roti is a type of flatbread that originated in the Caribbean, particularly Trinidad and Tobago. It is a staple in the diet of many Caribbean communities and is commonly enjoyed with various curries, stews, and other dishes.
2. How many calories are in Sada Roti?
The number of calories in Sada Roti can vary depending on the size and thickness of the roti. On average, a single serving of Sada Roti (approximately 100 grams) contains around 250-300 calories. It's important to note that this can vary based on the specific recipe used and any added ingredients.
3. Do you add baking powder to Sada Roti?
Yes, baking powder is commonly added to Sada Roti recipes. Baking powder helps the roti to rise and become soft and fluffy when cooked. However, not all recipes call for baking powder, and some traditional methods rely on the natural fermentation process of the dough to create the desired texture.
4. What causes Sada Roti to be stiff?
Several factors can cause Sada Roti to become stiff. One common reason is over-kneading the dough, which develops too much gluten and results in a tougher texture. Additionally, cooking the roti at too high a temperature or for too long can make it dry and stiff. It's important to find the right balance of kneading, cooking time, and temperature to achieve a soft and pliable Sada Roti.
5. How is Sada Roti prepared?
To prepare Sada Roti, the dry ingredients are mixed together, and then water is gradually added to form a soft dough. The dough is then kneaded until smooth and left to rest for a short period of time. After resting, the dough is divided into smaller portions, rolled out into round shapes, and cooked on a hot griddle or tawa until puffy and lightly browned.
6. Is Sada Roti gluten-free?
No, traditional Sada Roti is not gluten-free as it is made using all-purpose flour, which contains gluten. However, there are gluten-free variations available that use alternative flours such as rice flour or gluten-free all-purpose flour blends.
7. Can Sada Roti be stored or frozen?
Yes, Sada Roti can be stored for a short period of time at room temperature in an airtight container. If you plan to store it for a longer duration, it is recommended to freeze it. To freeze, allow the roti to cool completely, stack them with parchment paper in between each layer, and place them in a freezer-safe bag or container. They can be reheated by warming them on a griddle or in a microwave.
8. Can Sada Roti be made without oil?
Yes, Sada Roti can be made without oil. While some recipes may include a small amount of oil or ghee for added flavor and softness, it is not necessary for the basic preparation of Sada Roti.
9. What are some dishes that can be enjoyed with Sada Roti?
Sada Roti pairs well with a variety of dishes such as curries (vegetable, chicken, goat, or fish), stews, chutneys, and even with simple fillings like channa (chickpeas) or aloo (potato). It is versatile and can be used as a utensil to scoop up flavorful gravies and sauces.
Please note that these answers are general and may vary based on personal preferences and regional variations.
Conclusion
Making sada roti from scratch is not only a culinary adventure but also a way to connect with the rich traditions of Trinidadian cuisine. By following the steps outlined above and incorporating some of the tips and variations we've shared, you can achieve great success in creating this leavened flatbread.
So next time you want to explore the world of Trini flavors, why not try your hand at making sada roti? With its simple yet delicious taste and endless possibilities for pairing with various dishes, it's sure to become a favorite in your kitchen. Happy cooking!
References:
- My mom
- https://www.foodandwine.com/cooking-techniques/history-roti
- https://www.thespruceeats.com/roti-indian-flat-bread-1957389
- https://www.bbc.co.uk/history/british/empire_seapower/india_caribbean_01.shtml
- https://www.namahjournal.com/doc/Actual/Indian-Indentured-Labour-in-the-Caribbean-and-Fiji-vol-2-issue-1.html
Related Posts:
Please Sign Our
Petition to Preserve Our Ship Records
By Submitting this Form
This page may contain affiliate links and ads at no extra charge to you. If you purchase something from these links and ads, West Indian Diplomacy may earn a small commission that goes towards maintaining the website and sharing our history.
Book Recommendations
The First East Indians to Trinidad: Captain Cubitt Sparkhall Rundle and the Fatel Rozack
History of the People of Trinidad and Tobago
An Introduction to the History of Trinidad and Tobago

Legal Disclaimer
Your use of the content on this site or content from our email list is at your own risk. The use of this website does not create an attorney-client relationship. West Indian Diplomacy does not guarantee any results from using this content and it is for educational purposes only. It is your responsibility to do your own research, consult, and obtain a professional for your medical, legal, financial, health, or other help that you may need for your situation.
The information on West Indian Diplomacy is “as is” and makes no representations or warranties, express or implied, with respect to the content provided on this website or on any third-party website which may be accessed by a link from this Web site, including any representations or warranties as to accuracy, timeliness, or completeness. West Indian Diplomacy will not be liable for any losses, injuries, or damages from the display or use of this information.
All information on this website is accurate and true to the best of West Indian Diplomacy's knowledge, but there may be omissions, errors or mistakes. West Indian Diplomacy is not liable for any damages due to any errors or omissions on the website, delay or denial of any products, failure of performance of any kind, interruption in the operation and your use of the website, website attacks including computer virus, hacking of information, and any other system failures or misuse of information or products.
As of this date, West Indian Diplomacy does not write sponsored posts or accept free products for review. All thoughts and opinions written by West Indian Diplomacy is our own.
West Indian Diplomacy welcomes comments on blog posts. All comments submitted to us are the opinions of the author and do not necessarily reflect or represent the views, policies, or positions of this site. We reserve the right to use our own discretion when determining whether or not to remove offensive comments or images.